
Technical
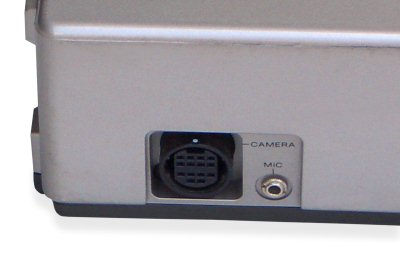 Camera and MIC connectors
|
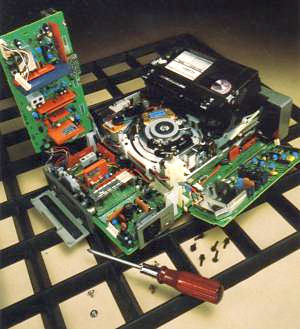
Camera SocketThe 14 Pin Camera socket found on the side of the unit is known as a Sony K-connector. Details of the pin connections are available online. A MIC connector is also available.Multi-ConnectorThe 8-pin Din Connector is known as a Sony Multi-connector and carries a combined Audio, Video and Remote control ( later known as CTRL-S ) signals. Details of the pin connections are available online.Fault and repair guideGetting insideTop Cover
Bottom cover
Access to the drive motors
Tuning problemsThere are sometimes problems with the SL-F1 tuner failing to lock on to a TV channel. The first thing to try is to switch off the AFT. This is to cater for the case whereby it is not locking onto a signal due to a NICAM sound carrier throwing it off.Failing that, it sounds like a fault, the problem is possibly that a fuse has gone. These though are very small circuit board (silicon) fuses. They are small components labeled f-1, f-2. If you have a meter and can find them it is possible to test to see if they have blown. This is quiet common on the F1. The first fuses to test are the ones nearest to the metal can (i.e. the DC to DC convertor). Irregular tape transport during rewind/review.This is cause by the tape which sticks to the upper drum when it is worn. It can be fixed by replacing the upper drum. Sony now supply an improved type which is made of a harder wearing alloy.The photo below shows the new upper drum which no longer has a mounting plate. Grating noise during tape threading/unthreading.This is caused by a split threading gear. Sony now supply an improved type which does not contain the inside metal bush. In the original design this would expand and cause the plastic to crack. It is also advisable to replace the threading belt at the same time.Machine appears dead.The circuit protectors in the secondary power supplies are common to failing. Check the one near the centre of the bottom PCB first. If all fuses check out OK then suspect failure of one of the micro processors. These are surface mount components and are difficult to replace.Tracking noise bar across picture.With older machines it is not unknown for the capstan servo lock to drift slightly. This can result in what looks like a tracking noise bar permanently across the picture. The cure is to readjust the capstan bias.
|
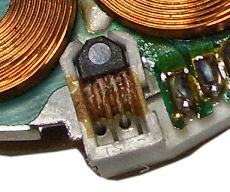 Hall effect sensor attached with glue |
No head drum rotation / shuts downYou may find that the head drum fails to rotate or shuts down after only a few seconds. This is due to a problem with the Hall effect device on the head drum motor which is secured by a blob of glue. Full details on how to fix this can be found on the head motor page. |
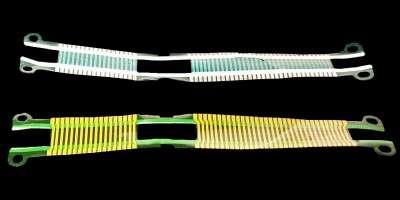
SL-F1 ribbon connector |
Erratic operationOver time, this ribbon connector is prone to fracture causing erratic behavior of the VCR. Symptoms include random operation of machine functions or loss of audio. Also pressing a button can get no response or a strange response.See also the ribbon connector parts page. |

Quick fault guide
Please click on the button if you are able to contribute a solution to this list or would like to add to, or update PALsite's information on this model. Please note, questions will be removed.If you have a question about this model, please raise it on the chatpage.
| Fault | Solution |
|---|---|
| Service manual | A service manual is available to download: SL-F1 service manual |
| Not unlacing tape | Check the unlace end sensing switch then Q611 and Q613 the unlacing end sense switching transistors on the system control panel |
| Drum running fast supply reel spins in reverse/foreword search | Check switching transistor Q204 in the system control for short circuit |
| Intermittent or no colour in playback and record | Modification: change R104 & R106 to 820ohms on panel 5F6 |
| No or poor sound in record mode | Check condition and setting of coil LV001 on panel LS8 if fault persists check coil L14 for failure |
| No operation via battery | Check fuse FB01 & zener diode D810 & diode D811 |
| No picture in playback or record | Check fuse FS04 on panel MA3 for failure |
| No playback | Check the pinch roller is engaging if not check the lever coupling between the roller and solenoid |
| No playback picture | Check for failure of 1C4 BX10221 on the SF5 panel |
| Rewinds at high speed in response to pause | Check IC203 TC40813P for failure |
| That clunky, twangy sound on rewind/f.fwd | See my fix under SL-C9 |
| channel buttons on ttf1 stuck and not responding | If you have stuck channel 1 - 12 buttons on your ttf1, this solution works. Remove top, bottom and front panels, and unscrew the hh1 board from the front fascia. use a needle and drop one or two drops of light plastics friendly oil (model railway gear oil is what I used) and drop one drop per micro switch between the button itself and the barrel of the switch. Leave to soak in for a few minutes and then gently try to work each micro-switch up and down until they are all free. Reassemble your f1 and try again the 1-12 buttons. If after first attempt strange behaviour is still seen from the buttons, apply one more drop each and work the switches free some more. I had to do this twice to fully cure the problem, but now all is well again. |
| Tuner unit TT-F1 dead (display off, all functions off, no voltage, no run...) | If the 1.6 amps fuse is broken, it is probably that the power supply block called "M" has failed.
If a new fuse fails also, there are a short circuits in the oscillator instead of the power unit "M".
|
| Tape won't lace automatically | If cassette detecting switch is working, check that the "thread end detection" microswitch (in the corner near camera connector) is being pressed down properly when a cassette is inserted, or recorder will just sit doing nothing; it'll play but stops after few seconds, obviously. The thing pressing the switch is adjustable with a flathead screwdriver. |
| No sound when playing | LS-8 board, capacitor C006 bad contact. I checked all capacitors for bad contact. I soldered it all again. There is sound again. |
| SLF1 - starts playing but stops in seconds. Same for fast forward or rewind | I did as in this video: www.youtube.com/watch?v=DbAemn0Ocqs Everything works again. I have in my collection sl2000, slf1(PAL) and slf1f(SECAM). I did it with everyone. |
| Stops after a few seconds | First check the reel motors are not sticking (see youtube video above). If this does not solve it, test the hall effect sensors to make sure they are still working. They may need replacing. See also Hall effect sensors |
| Tuner unit TT-F1 dead | Replaced usual Q611 Q612 and C618, C619 O/C 4.7uf 350v caps but still no drive. Eventually found IC681 on the Sub Panel Board C had a dead short pin 1 to chassis. Replaced the IC, all is now good. |