
Technical
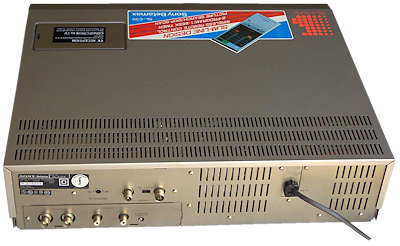 Rear view
|
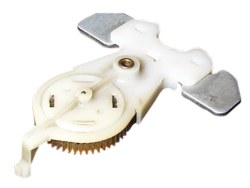
Stops in play or recordThis is becoming a more common problem these days. The first thing to check is that there is adequate torque on the take up spool. If there isn't much then the cause is usually down to two contributing factors.The first is the drive pendulum which can cease up and the second more serious factor, is wear on the reel motor bottom bearing. The pendulum is simple to replace but the bearing is moulded into the chassis and replacement necessitates that the entire chassis be replaced. One possible compromise is to fit a small piece of plastic into the bottom bearing to raise the rotor and allow it to move freely. Sony supply a repair kit for this purpose. The repair is as follows: you remove the rotor. Then drop the shim (or small ball bearing) into the hole where the spindle fits. Next you take a file to the bottom of the spindle and gently grind it down until the stator (electro magnets) and rotor (permanent magnets) gap is correct again. This can be tested by spinning the rotor gently with one finger. The rotor should make 3 or more complete rotations with a gentle push. There's no need to remove the motor pcb. The bearing is integral to the chassis and nothing is gained by removing the pcb. To remove the rotor you just pull. You need to do so strongly and evenly so that you have no sideways movement. The diagram above shows the pendulum assembly Stops in play, record and reverse/forward windDo not confuse this with the above symptoms. The problem in this case is due to lack of 4.43MHz colour sub-carrier reference in the servo circuit. This in turn is normally caused by failure of silicon fuse PS1 on the YC-25 board.Patterning on pictureIf you experience a patterning on the picture irrespective of whether you are viewing a tape or not then the most likely cause is that capacitor C319 in the power supply has dried up. |
 Hall effect sensor attached with glue |
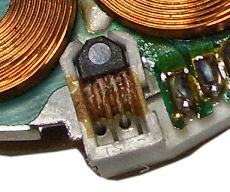
No head drum rotationYou may find that the head drum fails to rotate. This is due to a problem with the Hall effect device on the head drum motor which is secured by a blob of glue. Full details on how to fix this can be found on the head motor page.Deck goes into rewindThis can be caused by failure of the tape end sensor. You can check this by unplugging the sensor at its socket on the PCB. |
|
|
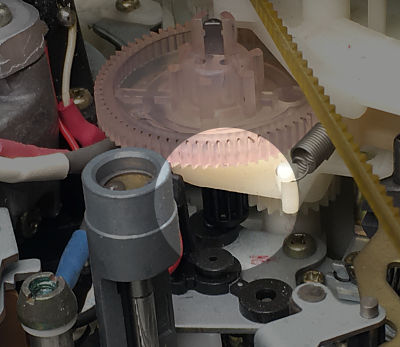
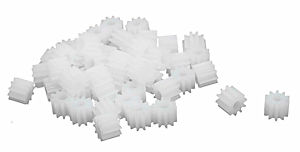
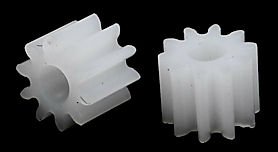
Loading gear and shaft repairThe loading shaft for the Sony has no official replacement but most times it can be repaired, unless the gear is in two pieces or a tooth has broken off. There are two approaches to solve this, either repair the broken gear, or purchase a similar gear and adapt it to fit.
In practice the diameter is sufficient and the reduced length does not really matter, just use super glue (or other suitable glue) to glue them to the shaft and protrude the shaft 1mm or so past the end.
See: RC-Toy-Car gears
If you don't need 50 then look for a smaller quantity but the price does not seem to change much. |
Quick fault guide
Please click on the button if you are able to contribute a solution to this list or would like to add to, or update PALsite's information on this model. Please note, questions will be removed.If you have a question about this model, please raise it on the chatpage.
| Fault | Solution |
|---|---|
| Damaging tapes or tape looping during eject | Check resistor R420 (3.3ohms) then transistor Q334 (2SC10613). |
| Insufficient or excessive colour in playback | Check resistor R019 (56Kohms) on panel YC25. |
| Intermittently will not eject-cassette | Check connector CN608 on the SS16 panel for a poor contact. |
| No capstan servo lock in record | Suspect failure of transistor Q332 (2SC2458) on panel SS16. |
| No colour | Check the value of resistors R024 (56k ohms) and R278 (10k ohms) before suspecting capacitor C047, all on the YC25 panel. |
| No E-E picture after 15 seconds, records in black and white | Adjust RV009 for 4.3volts p-p at C104 on panel YC25. |
| No functions or display | Check IC001 on the TP37 board |
| No play, FF or cue | Suspect failure of the forward sensor. |
| No take up / chewing tapes | Check condition and positioning of the pinch roller. |
| Not erasing previous recordings | Check for failure of Q503, Q501 (2SA8811) then Q502 (2SC24581) |
| On/standby switch inoperative, corrupt display | Check diode D001 on the TM37 panel. |
| Program display showing -au- | Check resistors R063 (120Kohms) and R073 (4.7ohms) before suspecting failure of IC003 on panel TU39 |
| Stopping in rewind / review mode | Suspect failure of transistor 0606 (2SC2458) on panel SS16 |
| Switches off shortly after switch on | Check PSU. regulator IC401 (STR1229) on the PS23 panel |
| Will not eject cassettes, pinch solenoid not operating | Check resistor R654 on panel S516 |
| Will not tune | Check for failure of IC004 on the TU39 board before suspecting the pre-set unit PS001 of failure |
| Intermittent squiggly patterning | Pattern is very similar to that caused by C319, but NOT applying to E-E loopthrough. Check Delay Line DL001 on video PCB. |
| Cassette jams before loaded properly (mentioned in text above) | The load arms go out of alignment under tension causing the jam due to failure of the left hand side gear which splits at the D section hole. Remove the assembly, fit a 7mm shim to the outside round of the white gear centre, realign the assembly and refit it to the machine. |
| Electrical tracking way off centre position | Replace C316 (0.22uF light blue Sanyo electrolytic capacitor)
If you have an oscilloscope perform adjustment as per service manual to achieve 7mS delay between the pulse monitored at TP405 and TP406 |
| Will not load tape | Load motor has jammed in centre of planetary gear due to a combination of corrosion and the lubricant drying up.
Remove planetary gear clean metal drive shaft. Clean out centre hole of black plastic planetary gear base with a 4.5mm drill by rubbing it in and out through the hole to remove dried lubricant. Apply a light coating of grease to shaft and gears and reassemble. |
| Speed or torque varies on spools (both playback and winding) | If the bearing and pendulum are ok and you still are experiencing speed or torque variations at the spool motor check the four 47uf/16V miniature electrolytics on the motor PCB. Clean the pcb, replace all four caps and check the traces for damage. |
| Slow in forward and or reverse | Also sudden drops in the winding speed and the tape tension didn't seem right sometimes in playback. Take a look at the four capacitors on the spool motor PCB. Check the four miniature 47uf/16V capacitors (Matsushita) to see if they are leaking. Clean the PCB and install new capacitors. |
| Unswitched 12V from power supply way to high | Check if voltage on pin 7 of CN304 is 12VDC +-0.5V. If it's way too high (14V or higher) check transistor Q309 (2SC2785 NPN). |
| Fluttering audio after press, REW and FFWD with picture search | Check for worn out tension band.
Replace the tension band, and re-adjust the back tension. |
| Cassette will be accepted and ejects but tape will not load | Check the position of the microswitch and notch next to the videodrum in the upper left corner of the deck. |
| Display will only say AV or switches between tuner and AV randomly | Clean the LINE-TUNER switch on the front panel with contact cleaner 390. |
| Soft white noise in audio and random dimming of display | Check all the small value (under 220uf) electrolytics on the PSU boards for leakage around the legs and replace. |
| No Record or E-E | No Record or E-E, playback O.K. Check for Dry joints on Q715 and Q716 RP7 Board. |
| Poor rewind | This can be due to the internal thermal fuse failing in the brake solenoid. |