 |
|
|
|
The Definitive Betamax Web Resource
|
||
|
|
|
|
The Definitive Betamax Web Resource
|
||
These days with the dominance of VHS it is possible to pick up second hand Betamax machines at modest prices. When in good condition they can be very reliable and give many years of good service. If you have a machine then it may well be worth renovating it.
Assuming you have bought an old Betamax VCR from a boot sale or now have a broken machine, what do you do next? The first question that should be asked is: Do you want the machine if it were working? This may seem a silly question but there is little point fixing up a VCR if it's not going to be of any use afterwards. ( I exclude collectors from such mundane considerations of course :) ). Betamax VCRs come in many different types, from the old-fashioned mechanical 'piano-key' type to the sleek hi-fi model. Some are clearly more desirable than others.
The first thing to do is to make a preliminary inspection. There are some checks which apply equally to all models. The first is to take a good look at the video. Check that it is not damaged in any way that may make it an electrical hazard. Look the outside of the unit over checking for signs that it might have been dropped or broken. Don't worry too much if any flaps have been snapped off, this often happens.
 Remove the lid and inspect the inside. Here
look for any loose wires, especially any that might be connected to the live
mains. Also take care to note any signs of corrosion particularly if it might
have been produced by a liquid spillage. Also look for any signs of black smoke
or scorching. If you do see anything that makes you unsure of the integrity of
the VCR, or which you feel may make it electrically unsafe then do not
connect it to the mains electricity supply.
Remove the lid and inspect the inside. Here
look for any loose wires, especially any that might be connected to the live
mains. Also take care to note any signs of corrosion particularly if it might
have been produced by a liquid spillage. Also look for any signs of black smoke
or scorching. If you do see anything that makes you unsure of the integrity of
the VCR, or which you feel may make it electrically unsafe then do not
connect it to the mains electricity supply.
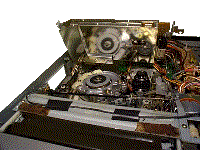
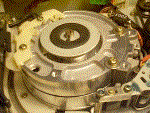
Assuming that all is well, now take a careful look at the mechanics inside the VCR. These will very enormously depending on the individual model. The early VCRs will contain numerous belts, idlers and tyres while the later models may just have a single belt inside them. To best see these parts it is usually necessary to remove the 'head preamplifier'. This looks like a big metal can sitting over the head. It normally hinges back after undoing two screws allowing full access.
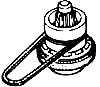 With regard to idlers and tyres examine the
rubber items carefully and if there are signs of age then they will need to be
replaced. Spares are still available for most models and can probably be
obtained through your local repair shop. (a full description of all these terms
is in the glossary). Make
sure none of the belts have snapped and that any cogs have all their teeth.
With regard to idlers and tyres examine the
rubber items carefully and if there are signs of age then they will need to be
replaced. Spares are still available for most models and can probably be
obtained through your local repair shop. (a full description of all these terms
is in the glossary). Make
sure none of the belts have snapped and that any cogs have all their teeth.
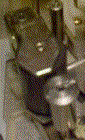 Examine the tape transport, including the pinch roller. If the VCR has
been in someone's garage for the last few years then it's almost certainly going
to need replacing. If the previous owner smoked, then this will probably be very
evident.
Examine the tape transport, including the pinch roller. If the VCR has
been in someone's garage for the last few years then it's almost certainly going
to need replacing. If the previous owner smoked, then this will probably be very
evident.
Do not be afraid to have a go at cleaning the rollers, belts and guides. This is best done using some cotton buds soaked in methylated spirits. Belts can be cleaned using an old cloth soaked in methylated spirits. If at all possible, remove the item from the machine to clean it. As a rule of thumb all rubber in the machine will age and will benefit from a clean. At the very least it will get the machine working temporarily until a proper replacement can be obtained. Old or dirty rubber in a machine accounts for the majority of faults in video machines.
Before spending money on replacement pinch rollers and idlers it is advisable to check that the electronics in the video are working properly. To do this plug the video into the mains supply and observe what happens. With power applied, most videos will display a flashing clock or at the very least a lamp will light up.
If you do not see anything on the clock display then the power supply in the VCR is probably faulty. Different models use different power supply arrangements. The later models tend to have a switched mode power supply (SMPSU). These are often quite difficult to fix, sometimes requiring a completely new module to be ordered. Earlier machines will use a conventional transformer and rectifier arrangement. These are far simpler to fault find.
Because of the high voltages present in the power supply
circuits it is advisable to leave them well alone unless you know exactly what
you are doing. Of course this doesn't stop you from checking the internal fuses . Before you do
so make sure the power is disconnected and be aware of any capacitors which may
have a high charge on them. It is best to leave the machine a few minutes after
disconnecting it before attempting any work. 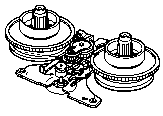
After powering up the VCR you should see some activity from the mechanism as the video performs some self diagnostic checks. If things are not working properly the VCR will shut down at this point and possibly indicate a fault in the display. If this is the case then there is probably a fault with one of the sensors or in the servo circuits. The sensors in the machine are very important, these range from optical sensors to contact switches. These tell the machine which mode the machine is in e.g. if a tape is present or if the tape has been threaded around the head. These switches often die with age, if you have a multimeter it should be quite straight forward to make sure each is working correctly. Connect the meter across the switch and check the resistance whilst pressing it. Make sure to switch the machine off before attempting this.
If all is OK then connect the video up to a television and aerial and tune it so that you can view off-air broadcasts through the video. This arrangement is known as E to E mode. ( E to E stands for electronic to electronic ). If all works as it should then proceed to insert a video cassette. When this is done try winding the tape forwards and backwards to check that the reel transport is functioning correctly. If this doesn't work or is not working 100% then make sure you have cleaned all the rubber inside. It often indicates that the 'idler' has failed which is also the case if the tape is not fully returned to the video cassette when the tape is ejected.
If all is working then next try to play a tape. If everything is OK then you should see a clean picture on the TV. If not then you will need to take a closer look to find out what has gone wrong. This can be a very technical job and is best left to the experts, but again there are some points which anyone can observe. In particular, take a look at the picture displayed when the VCR is in play mode. If the picture appears noisy or streaky then you have a clogged video head, or possible worse a worn video head.
If you suspect the video heads may be clogged then have a go at cleaning them. This is best done using a special video head cleaning tool such as those available from Maplin Electronics. Be very careful if you decide to attempt this job as the video head tips are extremely delicate and can be easily broken. There are in fact two sets of heads inside the machine, one set for audio and another for video ( and hi-fi sound if the machine has it ). The video heads are the most important and are on the large round silver lump which the tape is wrapped around. There are usually two or more heads on this. When cleaning the heads a high quality solvent should be used. Metholated spirits are not good enough and could leave a damaging residue on the heads. (See also the head cleaning guide)
Always clean the heads left to right as opposed to up and down. If you clean in an up and down motion the heads will be quickly damaged beyond repair and will need replacing. It is recommended not to use head cleaning tapes as these normally use a tape consisting of a fine abrasive which can excessively wear the head tips down. If you do not feel confident about cleaning the heads yourself then use a cleaning tape but only in small bursts. Recheck the picture after each burst, if no improvement is seen then clogged heads may not be the problem.
The audio heads should also be cleaned and look a little a similar to conventional audio heads in a tape machine (except a lot bigger). They are between the video heads and the pinch roller and can be cleaned using a lint free cloth. A good quality handkerchief can be used.
Finally try making a recording and playing it back. If you see a distorted picture with black streaks across it then the video head is definitely worn and will have to be replaced. Head wear is more easily detected when recording. If the player can play a pre-recorded tape back fine but recordings made on it are poor then this shows the heads are worn.
Occasionally the opposite can be seen, pre-recorded tapes appear to play back very badly but tapes recorded on the machine look a lot better or perfect. This indicates that the machine is badly aligned and needs to be correctly aligned using a special test tape. This needs to be performed by an expert.
Replacement heads are available for many models but fitting them
correctly is a job which needs to be left to the experts. Replacement heads come
in two forms, 'original' video heads from the manufacturers and 'replacement'
heads made by other manufacturers. The original heads are almost always superior
but can often by up to four times the price! In almost all cases, the
replacement head is perfectly acceptable. 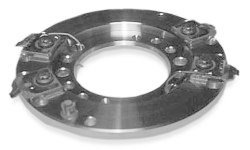
That completes this quick guide. The point to remember is that old Betamax videos can be given a new lease of life and there is no reason why you can't have a go at renovating one yourself.
The technical pages on this site list common faults and repair tips for specific models. Even if the exact model is not listed, there may be an equivalent model listed which will suffer from the same problems. It is still worth looking through to see if any of the symptoms match your specific problem, it would certainly be a good starting point.
If you manage to solve a problem, you can now add your solution to the quick fault guide at the bottom of the model's technical page.
The Repair Centre pages also show a number of parts, guides and information on fixing machines.
In addition to this short guide, an excellent guide to VCR repair and maintenance can be found at:
http://www.repairfaq.org/sam/vcrfaq.htm.
This guide explains in greater depth how to tackle bigger problems. At the very least, after reading these guides you can feel a lot more confident about explaining a fault to a service engineer and not feel so misled by any explanations offered.